Making lip balm at home takes under 15 minutes, costs a fraction of what you spend at the store, and gives you complete control over every ingredient that touches your lips. Most commercial lip balms rely on petroleum-based ingredients that sit on the surface without actually healing dry skin homemade versions use natural oils and butters that absorb properly and genuinely moisturize.
Whether you want a classic beeswax balm, a tinted version for everyday wear, a honey-infused formula for extra healing, or a fully vegan option, this guide covers all four recipes with clear steps and honest troubleshooting for when things do not go quite right.
Why Homemade Lip Balm is Worth Making
Store-bought lip balms are convenient, but most contain synthetic fragrances, preservatives, and petroleum derivatives that offer short-term relief while drying lips out further over time. When you make lip balm at home, every ingredient serves a real purpose beeswax creates a protective barrier, shea butter delivers deep moisture, and carrier oils like coconut or sweet almond oil nourish the delicate skin on your lips.
The cost difference is also significant. A single batch of homemade lip balm fills 7 to 8 standard tubes and costs under $1 per tube when you buy ingredients in basic quantities. The same quality in a natural brand at a health store runs $6 to $12 per tube.
What You Need Before Starting
Core Ingredients and What Each One Does
Understanding your ingredients makes you a better formulator not just someone following a recipe blindly.
Beeswax is the structural backbone of any lip balm. It hardens the mixture, creates a protective seal on the lips, and slows moisture loss. Use pellets rather than blocks they melt faster and measure more easily.
Shea butter is deeply moisturizing and absorbs well without feeling greasy. It contains vitamins A and E naturally, which support skin repair. Cocoa butter is a reliable alternative with a mild chocolate scent.
Coconut oil adds softness, spreads easily on lips, and has mild antimicrobial properties. It is solid at room temperature, which helps the balm hold its shape in cooler climates. Sweet almond oil or jojoba oil work well as substitutes for a lighter feel.
Essential oils are optional but add both scent and function. Peppermint gives a cooling tingle and mild plumping effect. Lavender soothes irritated skin. Always use cosmetic-grade essential oils and keep quantities low lips are sensitive and sit close to the mouth.
Vitamin E oil is an antioxidant that extends shelf life and adds extra skin-conditioning benefits. A few drops per batch is enough.
Equipment You Will Need
- Small glass measuring cup or heat-safe bowl
- Saucepan for double boiler setup
- Wooden craft stick or silicone spatula
- Lip balm tubes, small tins, or mini glass jars
- Kitchen scale or measuring spoons
- Oven mitts
Basic Method: How the Double Boiler Works
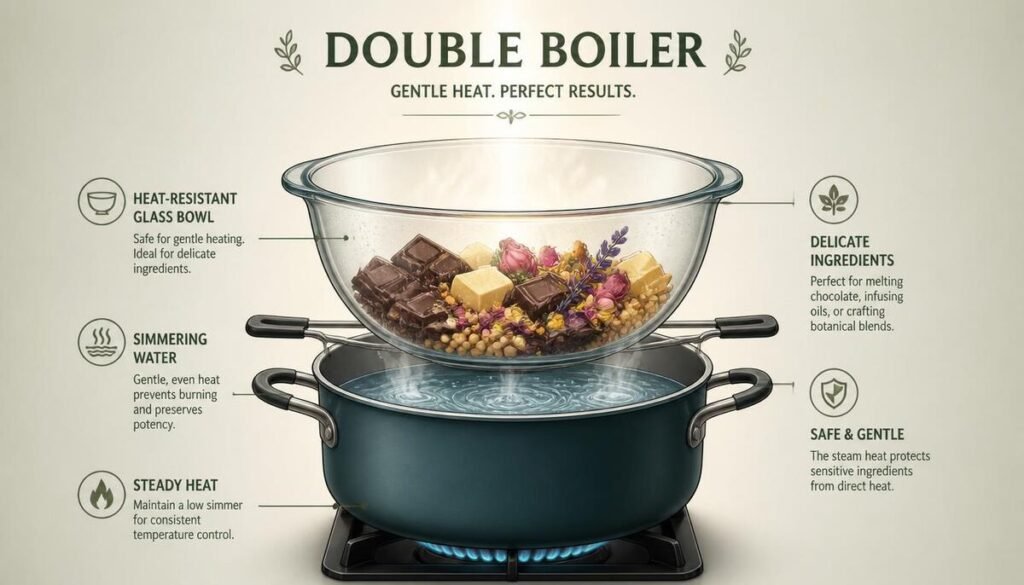
Every lip balm recipe in this guide uses the same core method: a double boiler. This means placing your ingredients in a heat-safe container set over a pot of simmering water. The indirect heat melts everything gently without burning the oils or destroying the benefits of your butters.
Never melt lip balm ingredients directly over open flame. Direct heat damages the fatty acids in shea butter and can cause beeswax to scorch, ruining both the texture and the skin benefits.
4 Homemade Lip Balm Recipes to Try
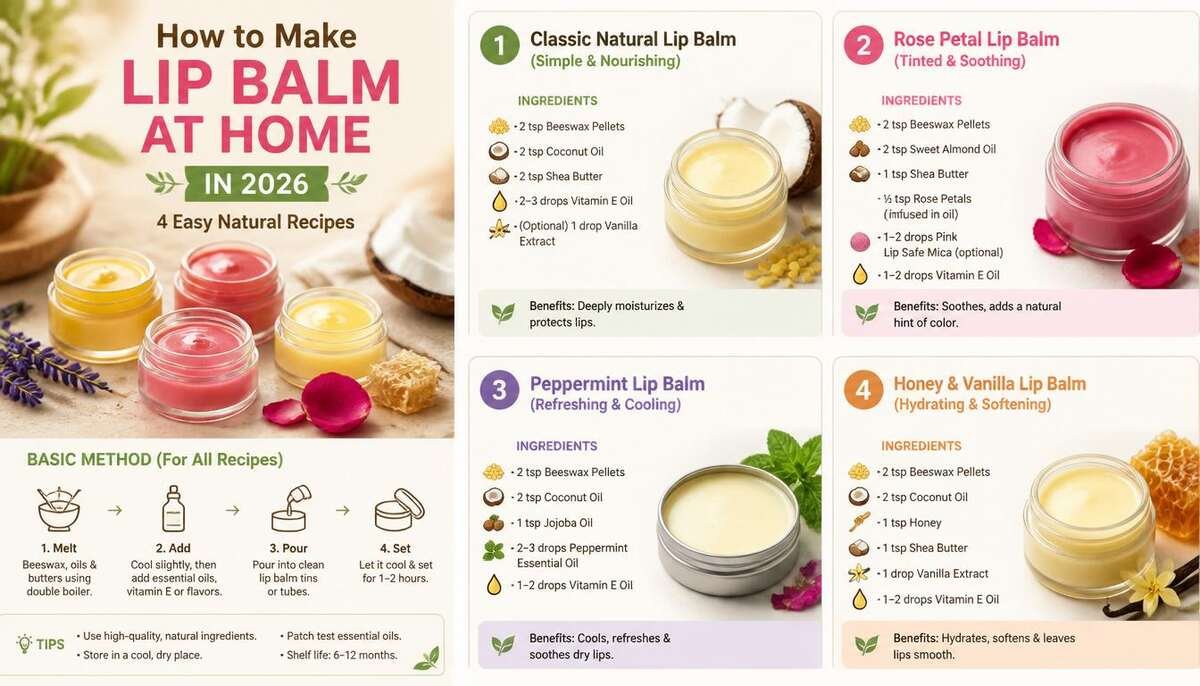
Recipe 1 Classic Beeswax Lip Balm (Best for Beginners)
This is the most forgiving recipe and the best starting point for anyone making lip balm for the first time.
Ingredients:
- 1 tablespoon beeswax pellets
- 1 tablespoon shea butter
- 3 tablespoons coconut oil
- 10 drops peppermint or lavender essential oil (optional)
Steps:
Step 1 Set up your double boiler. Pour about an inch of water into a small saucepan and heat it over medium until it reaches a gentle simmer. Set a heat-safe glass bowl or measuring cup over the pan.
Step 2 Combine and melt. Add the beeswax pellets, shea butter, and coconut oil to the glass cup. Stir occasionally and allow everything to melt completely. Beeswax takes the longest do not rush the heat.
Step 3 Remove from heat. Once fully melted and blended, remove the cup from the saucepan and let it cool for two minutes. This brief cooling protects the essential oils from evaporating immediately.
Step 4 Add essential oils. Drop in your chosen essential oil and stir well to distribute evenly.
Step 5 Pour and set. Carefully pour the liquid into your lip balm tubes or tins. Fill to the very top the mixture sinks slightly as it cools and hardens. Leave undisturbed for 20 to 30 minutes at room temperature, or place in the fridge for 10 minutes to speed things up.
This batch fills approximately 7 standard lip balm tubes.
Recipe 2 Honey and Coconut Oil Lip Balm
Honey is a natural humectant it draws moisture from the environment into the skin, which makes it an excellent addition for severely chapped or cracked lips. This recipe works best poured into small tins rather than tubes because the honey can occasionally settle if the mixture cools too slowly.
Ingredients:
- 1 tablespoon beeswax pellets
- 2 tablespoons coconut oil
- 1 tablespoon sweet almond oil
- 1 teaspoon raw honey
- 8 drops vanilla or chamomile essential oil (optional)
Steps:
Follow the same double boiler method as Recipe 1. Melt beeswax, coconut oil, and sweet almond oil together first. Remove from heat and allow the mixture to cool for three full minutes before stirring in the honey adding honey while the mixture is too hot causes it to separate and sink to the bottom of the container. Stir vigorously after adding honey, then pour immediately into tins. Cap once fully set.
Recipe 3 Tinted Lip Balm at Home
A subtle natural tint transforms basic lip balm into an everyday beauty product. Beetroot powder gives a soft rose-pink tone. Cocoa powder adds a warm nude-brown. Both are entirely lip-safe and skin-friendly.
Ingredients:
- 1 tablespoon beeswax pellets
- 1 tablespoon cocoa butter
- 2 tablespoons sweet almond oil
- ½ teaspoon beetroot powder (for pink) or cocoa powder (for nude)
- 5 drops rose or vanilla essential oil (optional)
Steps:
Melt beeswax, cocoa butter, and sweet almond oil using the double boiler method. Once melted, remove from heat and whisk in the beetroot or cocoa powder thoroughly uneven mixing leaves streaks in the finished balm. Add essential oil, then pour into tubes or tins. The color will appear more intense in the liquid state and settle to a softer, wearable tint once hardened.
A common mistake here is adding too much powder. Start with half a teaspoon per batch and adjust next time if you want deeper color.
Recipe 4 Vegan Lip Balm Without Beeswax
Candelilla wax is the standard beeswax substitute in vegan lip balm. It is plant-derived, harder than beeswax by nature, and requires less quantity to achieve the same firmness use roughly half the amount you would use of beeswax.
Ingredients:
- ½ tablespoon candelilla wax (or carnauba wax)
- 1 tablespoon shea butter
- 3 tablespoons jojoba oil
- 5 drops peppermint or spearmint essential oil
Steps:
The method is identical to Recipe 1. Candelilla wax takes slightly longer to melt than beeswax pellets, so keep the heat consistent and stir patiently. Do not increase the heat to rush it. Once melted, remove from heat, add essential oil, and pour immediately this mixture sets faster than beeswax-based formulas.
Ingredient Substitution Guide
| Original Ingredient | Best Substitute | Effect on Final Balm |
| Beeswax | Candelilla wax (use half amount) | Slightly harder texture |
| Shea butter | Cocoa butter or mango butter | Similar moisture, different scent |
| Coconut oil | Sweet almond oil or jojoba oil | Softer, lighter texture |
| Peppermint essential oil | Spearmint, lavender, or vanilla | Different scent, same function |
| Beetroot powder (tint) | Cocoa powder, alkanet root powder | Different tone — nude vs pink |
Best Essential Oil Combinations for Lip Balm

Essential oils do more than add fragrance. The right combination can soothe, protect, and even subtly plump lips. A few pairings that work particularly well in practice:
Peppermint + Vanilla the classic chapstick feel with a warm, sweet base. Best for everyday use.
Lavender + Chamomile calming and anti-inflammatory. Excellent for very dry or sensitive lips.
Spearmint + Lemon fresh and bright without the intense tingle of pure peppermint. Good for summer batches.
Rose + Geranium floral and feminine. Pairs naturally with the tinted recipe.
Keep total essential oil drops at 10 or under per tablespoon of base ingredients. More than that can cause irritation on the sensitive lip area.
Troubleshooting Common Lip Balm Problems
Lip Balm Is Too Hard
Too much beeswax relative to your oils creates a balm that drags on application rather than gliding. Melt the batch again and add one additional teaspoon of coconut oil or sweet almond oil. Remix and repour.
Lip Balm Is Too Soft
The opposite problem too little wax or too much liquid oil. Melt again and add a small additional amount of beeswax pellets, roughly half a teaspoon at a time, until you reach the firmness you prefer.
Grainy or Gritty Texture
This is the most common issue when using shea butter, and it comes from the butter cooling too slowly after melting. To prevent it, heat shea butter separately over low heat for 15 to 20 minutes before adding it to the rest of your ingredients. Alternatively, place finished lip balm into the fridge immediately after pouring to cool it quickly rapid cooling prevents shea butter crystals from forming.
Honey Sinking to the Bottom
This happens when the mixture is still too hot when honey is added. Always let the melted oils cool for at least three minutes off the heat before stirring in honey. Stir immediately and pour quickly before the mixture begins to set.
Troubleshooting Quick Reference
| Problem | Most Likely Cause | Fix |
| Too hard | Too much beeswax | Remelt and add more oil |
| Too soft | Too little wax | Remelt and add beeswax |
| Grainy texture | Shea butter crystallized | Cool quickly in fridge next time |
| Honey settling | Added honey while too hot | Wait 3 mins before adding honey |
| Color streaks (tinted) | Powder not mixed fully | Whisk more thoroughly |
| Essential oil scent faint | Added while too hot | Add after cooling 2-3 mins |
Shelf Life and Storage
Homemade lip balm stored in a cool, dry place lasts up to two years. Adding vitamin E oil to any of the recipes above extends this shelf life further by slowing oxidation of the carrier oils.The Nerdy Farm Wife
Avoid storing lip balm in direct sunlight or in a hot car heat softens the balm and can cause separation over time. If you live in a warm climate, keep your personal stash in the fridge and only carry one tube at a time.
Label each batch with the date made and the ingredients used. This is especially useful if you are making multiple scent variations or gifting batches to others.
Packaging and Gift Ideas
Homemade lip balm makes a genuinely thoughtful gift because it is useful, personal, and clearly made with care. A few packaging ideas that work well in practice:
Small kraft paper boxes with 3 to 4 tubes make a neat skincare gift set. Pair a classic peppermint tube with a tinted rose version and a honey healing balm for variety. If you enjoy a broader natural skincare routine, pairing homemade lip balm with a homemade body scrub creates a complete DIY gift set that costs very little but feels genuinely luxurious.
Metal tins with hand-written labels add a rustic, artisan feel. Stick-on labels with the scent and date keep things organized when you make multiple batches.
For a fuller natural beauty kit, combine your lip balm with a homemade eyelash serum both are quick to make and use overlapping natural ingredients.
Frequently Asked Questions
How long does it take to make lip balm at home?
The entire process takes about 15–20 minutes from start to finish, plus 20–30 minutes for the balm to set. It is one of the fastest and easiest DIY beauty projects you can make at home.
Can I make lip balm without beeswax?
Yes. Candelilla wax and carnauba wax are excellent plant-based alternatives to beeswax. Since both are naturally harder, use about half the amount you would normally use for beeswax.
How many tubes does one batch make?
A standard batch made with 3 tablespoons of carrier oil, 1 tablespoon of beeswax, and 1 tablespoon of butter typically fills 7–8 standard lip balm tubes or 4–5 small tins.
Kaiven Zoro is focused on growth, learning, and building meaningful results. With a practical mindset and consistent effort, he values progress over perfection. He believes in staying disciplined, improving every day, and turning ideas into reality.